Oracle web tier apply patch set 11.1.1.9 to existing 11.1.1.7

Backup complete 11.1.1.7 home

cd $MW_HOME

tar -cvf Oracle_WT1_backup.tar Oracle_WT1

Note: run tar as root to backup all files

Download 11.1.1.9 patchset – patch 20995453

Unzip and go to Disk1 folder

unzip p20995453_111190_Linux-x86-64.zip

Run the installer

cd Disk1

./runInstaller

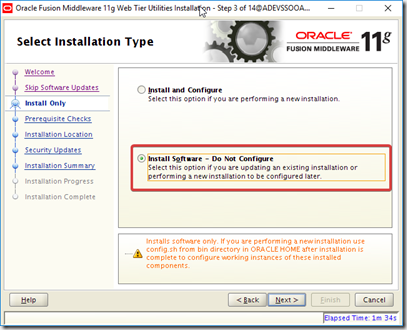
Choose “Install software – Do Not Configure
XWin_MobaX_2018-02-27_11-00-23

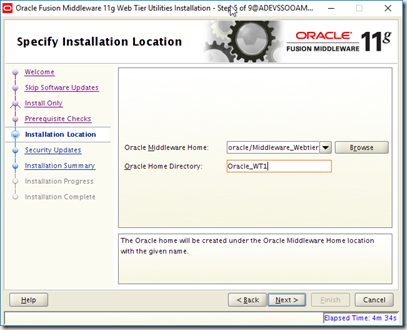
specify Installation Location
XWin_MobaX_2018-02-27_11-03-23

chrome_2018-02-27_11-04-08
XWin_MobaX_2018-02-27_11-12-54

Verify

$ORACLE_HOME/OPatch/opatch lsinventory

Oracle Interim Patch Installer version 11.1.0.11.0
Copyright (c) 2018, Oracle Corporation.  All rights reserved.

Oracle Home       : /u01/product/oracle/Middleware_Webtier/Oracle_WT1
Central Inventory : /u01/app/oraInventory
    from           : /u01/product/oracle/Middleware_Webtier/Oracle_WT1/oraInst.loc
OPatch version    : 11.1.0.11.0
OUI version       : 11.1.0.9.0
Log file location : /u01/product/oracle/Middleware_Webtier/Oracle_WT1/cfgtoollogs/opatch/opatch2018-02-27_11-15-21AM_1.log

OPatch detects the Middleware Home as “/u01/product/oracle/Middleware_Webtier”

Lsinventory Output file location : /u01/product/oracle/Middleware_Webtier/Oracle_WT1/cfgtoollogs/opatch/lsinv/lsinventory2018-02-27_11-15-21AM.txt

——————————————————————————–
Installed Top-level Products (1):

Oracle WebTier and Utilities CD                                      11.1.1.9.0
There are 1 products installed in this Oracle Home.

start OHS instance

$INSTANCE_HOME/bin/opmnctl startall

$INSTANCE_HOME/bin/opmnctl status

Processes in Instance: ohs1
———————————+——————–+———+———
ias-component                    | process-type       |     pid | status
———————————+——————–+———+———
ohs1                             | OHS                |   33731 | Alive

If web tier is associated to weblogic domain follow below step

cd ORACLE_HOME/opmn/bin

./upgradenonj2eeapp.sh
-oracleInstance Instance_Home_Location
-adminHost WebLogic_Server_Host_Name
-adminPort administration_server_port_number
-adminUsername administration_server_user

MobaXterm_Personal_10.5_2018-02-27_11-26-15

Oracle HTTP Server 11.1.1.9 – Update SSLProtocol to TLS v1.2

TLS v1.1 and v1.2 are significantly more secure and fix many vulnerabilities present in SSL v3.0 and TLS v1.0.

OHS 11.1.1.9 supports TLSv1.1 and TSLv1.2. This post covers steps to configure OHS SSL protocols to support TLSv1.2 only and disable all other protocols.

Check protocols and ciphers supported
You can use below nmap command to check currently supported protocols and ciphers

nmap –script ssl-enum-ciphers –p <SSL_PORT> <HOSTNAME>

Update SSLProtocol
Go to ORACLE_INSTANCE/config/OHS/< OHS_name >/ssl.conf
Edit SSLProtocol as below

SSLProtocol +TLSv1.2

Optional: You can add or update SSLCipherSuite as well

SSLCipherSuite TLS_RSA_WITH_AES_256_GCM_SHA384,TLS_RSA_WITH_AES_256_CBC_SHA256,TLS_RSA_WITH_AES_128_GCM_SHA256,TLS_RSA_WITH_AES_128_CBC_SHA256

For list of supported SSLCipherSuite check https://docs.oracle.com/middleware/11119/webtier/releasenotes-ohs/toc.htm

Save the file and restart OHS instance

Verify the change
Verify again by running same nmap command
2018-02-20_15-07-48

Best Practice for IAM Projects

OAM 11gR2PS3 Multi Factor Authentication – Adaptive Authentication Service

The Adaptive Authentication Service offers stronger multifactor (also referred to as second factor) authentication for sensitive applications that require additional security in addition to the standard user name and password type authentication.

The second factor can be a One Time Pin (OTP) or an Access Request (or push) Notification. After an initial successful user/password authentication, a Second Factor Authentication page is displayed from which the user selects the preferred method of second factor authentication.
The following options are available:

  • OTP from Oracle Mobile Authenticator

  • OTP through SMS

  • OTP through Email

  • Access Request Notification from Oracle Mobile Authenticator

For using Oracle Mobile Authenticator in this post you must complete steps 1,2,7,8,9 from below post
https://oraidam.wordpress.com/2018/01/29/integrate-oam-11g-r2-ps3-and-oracle-mobile-authenticator/

In this post we will configure OAM for multi factor authentication with OTP through Email or SMS or Oracle Mobile Authenticator.

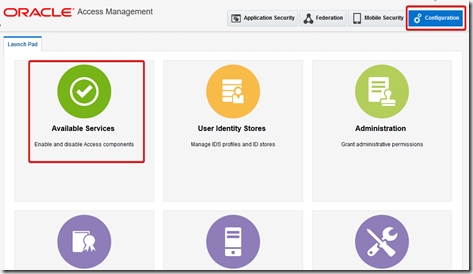
1. Enable “Adaptive Authentication Service”, login to OAM console –> Configuration –> Available Services
firefox_2018-02-19_11-14-39

2. Configure AdaptiveAuthenticationPlugin
Click on AUthentication plugins from OAM Console
firefox_2018-02-19_11-16-44
Search for plugin and click on it to edit properties
firefox_2018-02-19_11-17-25

3. Edit below properties in AdaptiveAuthenticationPlugin

SFATypes
Totp:Sms:Email:Push

UmsAvailable
true

UmsClientUrl
http://identity.oracleads.com:8001/ucs/messaging/webservice

EmailMsgFrom
workflow.admin@oracleads.com

Totp_Enabled
true

Email_Enabled
true

Sms_Enabled
true

EmailField
mail

PhoneField
mobile

TotpSecretKeyAttribute
description

Click on Save
Make the same changes in

4. Add credentials for UMS in weblogic domain
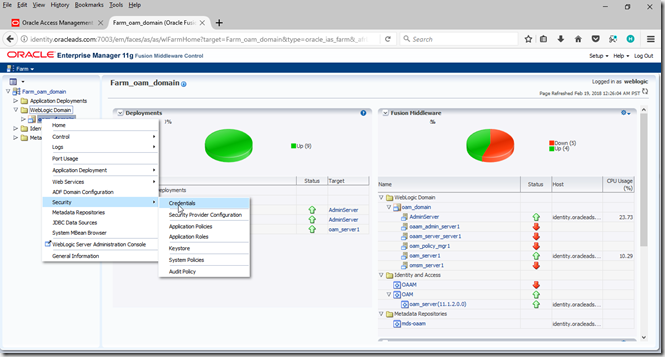
Login to weblogic Enterprise Manager, go to domain –> security –> credentials
firefox_2018-02-19_11-26-12
Expand OAM_CONFIG click on create key
firefox_2018-02-19_11-27-57
firefox_2018-02-19_11-29-35
Create umsKey as shown above and click ok.

5. Protect the resource
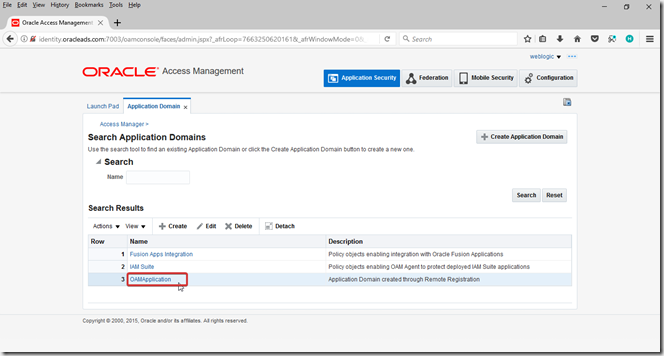
Go to application domain
firefox_2018-02-19_11-31-27
Go to Authentication Policies –> Protected Resource Policy
firefox_2018-02-19_11-32-03
firefox_2018-02-19_11-32-33
Go to Advanced Rules –> Post Authentication and click on Add
firefox_2018-02-19_11-33-00
firefox_2018-02-19_11-34-01
Click Add and click on Apply

Testing:
As we mentioned in configuration, make sure all below attributes are populated in user profile for testing all options.
EmailField: mail
PhoneField: mobile
firefox_2018-02-19_11-37-53
TotpSecretKeyAttribute: description
This attribute description will be populated automatically when you setup Oracle Mobile Authentication as specified in https://oraidam.wordpress.com/2018/01/29/integrate-oam-11g-r2-ps3-and-oracle-mobile-authenticator/ at Step 8,9
firefox_2018-02-19_11-39-50

Now hit the requested resource, you will be prompted for login using username and password for first factor authentication.
image
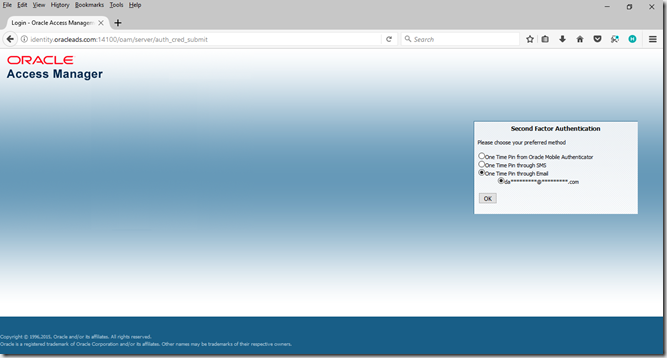
Supply username and password and click on Login. After successful login you will be prompted for option to choose for second factor login.
image
Select the option and click on OK.
image
Then supply pin for second factor authentication and click login to access protected resource
image
image

Demo: https://youtu.be/LiP1O99EUGU

Weblogic 12c Server State and Health State Monitoring with Email Notification

Configure Weblogic Mail Session (Optional. Only if you want to send email alert)
1. Login to weblogic console
2. Go to Mail Sessions
3. Click New
4. Enter details Name,JNDI Name, JavaMail Properties.

mail.port=25
mail.user=weblogic
mail.host=xx.xx.xx.xx
mail.transport.protocol=smtp
mail.from=weblogic

Configure Email Notifications in Weblogic Diagnostic
Go to Weblogic Console –> Diagnostic Modules –> Select Module “Module-FMWDFW” –> Configuration –> Policies and Action –> Actions
chrome_2018-02-19_12-09-33
Click new –> Select SMTP (E-Mail) –> Click Next –> Enter Notification Name & Check Enable Notification –> Got to SMTP Properties –> Select Mail session ->Enter Email Recipients

Server State Monitoring
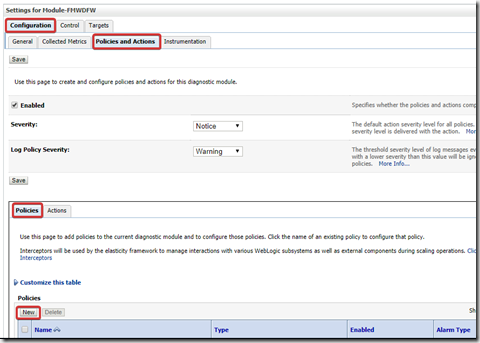
1.Go to Weblogic Console –> Diagnostic Modules –> Select Module “Module-FMWDFW” –> Configuration –> Policies and Action –> Policies
2018-02-19_12-17-13
click New. Enter Details as below

Name: ServerStateWatch
Policy Type: Collected Metrics
Enable Policy: checked

Add rule expression as below, where slc.state is the state of server and slc.name is name of server

wls.domainRuntime.domain.serverLifeCycleRuntimes.stream().anyMatch(slc ->
((slc.state != ‘RUNNING’) and ( (slc.name == ‘AdminServer’) or (slc.name == ‘ManagedServer1’) ) ))

Then choose schedule and alarms in next screen as per requirement. In actions select email notification which was created in earlier step.
chrome_2018-02-19_12-23-11

Health State Monitoring
Go to Weblogic Console –> Diagnostic Modules –> Select Module “Module-FMWDFW” –> Configuration –> Policies and Action –> Policies
2018-02-19_12-17-13

click New. Enter Details as below

Name: ThreadPoolStateWatch
Policy Type: Collected Metrics
Enable Policy: checked

Add rule expression as below, where state is the health state of server and serverName is name of server

wls.domainRuntime.lookupServerRuntime(serverName=’AdminServer’).threadPoolRuntime.healthState.state != 0 or wls.domainRuntime.lookupServerRuntime(serverName=’ManagedServer1’).threadPoolRuntime.healthState.state != 0

Then choose schedule and alarms in next screen as per requirement. In actions select email notification which was created in earlier step.
chrome_2018-02-19_12-23-11

OAAM Second Factor Authentication – OTP via Email or SMS

Pre-Requisite: OAAM Advanced TAP Integration with OAM
https://oraidam.wordpress.com/2018/02/14/oaam-advanced-integration-with-oam-tap-integration/

Enable OTP Anywhere Registration
Set below properties to true

bharosa.uio.default.register.userinfo.enabled
bharosa.uio.default.userpreferences.userinfo.enabled

Login to OAAM admin console, go to properties
firefox_2018-02-14_13-44-27firefox_2018-02-14_13-45-11

Setting Properties in OAAM for User Messaging Service
set below properties

bharosa.uio.default.ums.integration.webservice http://identity.oracleads.com:8001/ucs/messaging/webservice

bharosa.uio.default.ums.integration.useParlayX
false

bharosa.uio.default.ums.integration.userName
workflow.admin@oracleads.com

bharosa.uio.default.ums.integration.password
Oracle123

bharosa.uio.default.ums.integration.fromAddress
workflow.admin@oracleads.commkdir oaam_extensions

bharosa.uio.default.otp.optOut.enabled
true

SMS & Email Properties

bharosa.uio.default.challenge.type.enum.ChallengeEmail.available
true

bharosa.uio.default.userinfo.inputs.enum.email.enabled
true

bharosa.uio.default.challenge.type.enum.ChallengeSMS.otp
true

bharosa.uio.default.userinfo.inputs.enum.mobile.enabled
true

bharosa.uio.default.userinfo.inputs.enum.mobile.required
true

Configuring OTP Presentation (Optional)
If you intend to change the OTP device used for challenge change to pin pad change below property

bharosa.uio.default.ChallengeEmail.authenticator.device
DevicePinPad

Restart OAAM managed server for properties to take effect.

Configure OAAM Policy for Second Factor Authentication
Go to policies, select OAAM Post authentication Security policy
firefox_2018-02-14_15-57-18
Go to Rules, Add a new rule
firefox_2018-02-14_15-58-32
firefox_2018-02-14_15-59-08
firefox_2018-02-14_15-59-29
firefox_2018-02-14_15-59-45
Now go to OAAM Challenge group.
firefox_2018-02-14_16-01-51
Change the actions as follows
firefox_2018-02-14_16-14-51
firefox_2018-02-14_16-02-20
Now go to OAAM Challenge Policy
firefox_2018-02-14_16-03-51
In as below in Trigger Combinations tab and click on apply
firefox_2018-02-14_16-04-39

Testing
Demo: https://youtu.be/uHuhgaGmpQI

OAAM Strong Authentication – Knowledge Based Authentication (KBA)

Pre-Requisite: OAAM Advanced TAP Integration with OAM
https://oraidam.wordpress.com/2018/02/14/oaam-advanced-integration-with-oam-tap-integration/

KBA is a secondary authentication method. It is presented after successful primary authentication (for example, a user entering a single factor credentials, such as a user name and password) to improve authentication strength.

The KBA solution consists of securing an application using a challenge/response process where users are challenged with one or more questions to proceed with their requested sign-on, transaction, service, and so on.

Log in into OAAM admin console
Go to Policies –> OAAM Post authentication Security
2018-02-14_10-27-58
Go to Rules Tab and click on +
firefox_2018-02-14_10-29-33
Enter information as below
firefox_2018-02-14_10-31-08
Add a condition
firefox_2018-02-14_10-53-00
firefox_2018-02-14_10-50-39
Click apply
Now go to OAAM Challenge Policy –> Trigger Combinations
Change the 3rd trigger as shown below and apply
firefox_2018-02-14_10-56-43

Testing
Request the protected resource
http://identity.oracleads.com:7777
firefox_2018-02-14_11-00-19
firefox_2018-02-14_11-00-49
firefox_2018-02-14_11-01-18
firefox_2018-02-14_11-01-38

OAAM Advanced Integration with OAM (TAP integration)

In this integration OAAM Server acts as a trusted partner application. The OAAM Server uses the Trusted authentication protocol (TAP) to communicate the authenticated username to OAM Server after it performs strong authentication and risk and fraud analysis. The OAM Server then redirects the user to the protected resource.

Pre-requisites
OAM 11.1.2.3 is installed and configured
OHS server is installed and configured
OAM Webgate agent on OHS is registered with OAM

Creating the OAAM Admin Users and OAAM Groups
Log in to weblogic console
Navigate to security realms –> myrealm –> Users and Groups –> Users
Create new user, click on new
firefox_2018-02-12_21-33-11
Enter information and click ok
firefox_2018-02-12_21-43-45
Now click on newly created user
firefox_2018-02-12_21-44-20
Go to groups tab select all OAAM groups and click save
firefox_2018-02-12_21-45-15

Import the OAAM base snapshot
Base snapshot is locate in ORACLE_HOME/oaam/init
File: oaam_base_snapshot.zip
Start OAAM Admin Server and log into OAAM admin console with new user. OAAM Admin console URL is

http://oaam_managed_server_host:oaam_admin_managed_server_port/oaam_admin
http://identity.oracleads.com:14200/oaam_admin

Go to System Snapshots and click load from file.
firefox_2018-02-12_21-48-17
Select base snapshot file and click load
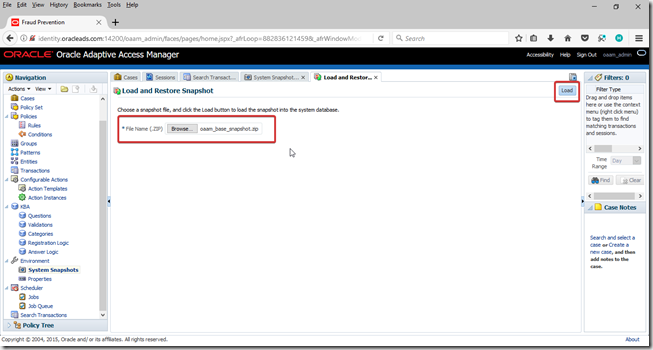
firefox_2018-02-12_21-49-48
image
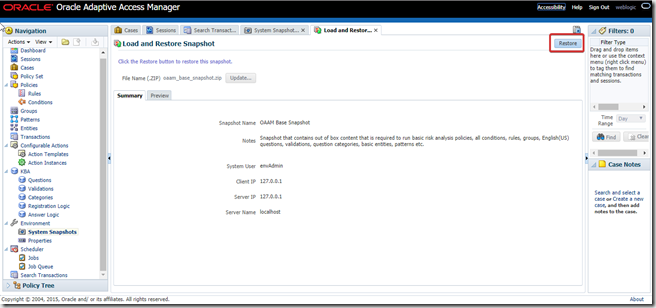
Click restore
chrome_2018-02-12_22-23-53
image

Validate initial configuration of OAAM
Go to

http://host:port/oaam_server
http://identity.oracleads.com:14300/oaam_server

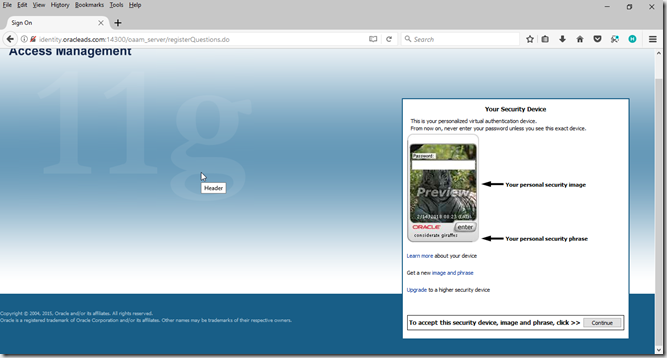
Enter any username click continue
firefox_2018-02-12_22-26-13
Enter password as “test”and click enter
firefox_2018-02-12_21-58-36
Click continue
firefox_2018-02-12_22-13-18
Click continue
firefox_2018-02-12_22-14-15
Enter security questions and answers (KBA) and click enter
firefox_2018-02-12_22-27-31firefox_2018-02-12_22-28-14
If you are not able to validate OAAM initial configuration as in above, you must fix it before proceeding further.

Register the OAAM Server as a Partner Application to OAM
If OAAM is registered with Access Manager as a partner application, OAAM will then be able to communicate with Access Manager via the Trusted Authentication Protocol (TAP) to communicate the authenticated user name to the OAM Server after it performs strong authentication, risk, and fraud analysis, and the OAM Server owns the responsibility for redirecting to the protected resource.

If authentication is successful and the user has the appropriate profile registered, Oracle Adaptive Access Manager constructs the TAP token with the user name and sends it back to Access Manager. Access Manager asserts the token sent back. After asserting the token, Access Manager creates its cookie and continues the normal single-sign on flow in which it redirects the user to the protected resource.

Create a keystore directory

export IAM_ORACLE_HOME=/app/Middleware/Oracle_IDM1
mkdir -p $IAM_ORACLE_HOME/TAP/TapKeyStore

Run wlst.sh and connect to weblogic

cd $IAM_ORACLE_HOME/common/bin
./wlst.sh

wls:/offline> connect()
Please enter your username :weblogic
Please enter your password :
Please enter your server URL [t3://localhost:7001] :t3://identity.oracleads.com:7001

Run register command
registerThirdPartyTAPPartner(partnerName = “partnerName”, keystoreLocation=
“path to keystore”, password=”keystore password”, tapTokenVersion=”v2.0″,
tapScheme=”TAPScheme”, tapRedirectUrl=”OAAM login URL”)

registerThirdPartyTAPPartner(partnerName=”OAAMTAPPartner”,keystoreLocation=”/app/Middleware/Oracle_IDM1/TAP/TapKeyStore/mykeystore.jks”,password=”Oracle123″,tapTokenVersion=”v2.0″,tapScheme=”TAPScheme”,tapRedirectUrl=”http://identity.oracleads.com:14300/oaam_server/oamLoginPage.jsp”)

image

Adding a Password to the IAMSuiteAgent Profile
This profile is used by Oracle Adaptive Access Manager when integrating with Access Manager. When the IAMSuiteAgent profile is first created, it has no password. You must set a password before the profile can be used by Oracle Adaptive Access Manager for integration.
Log into oamconsole, click on agents
firefox_2018-02-12_22-47-51
Click search, select IAMSuiteAgent, update Access Client Password and click on applyfirefox_2018-02-12_22-49-10

Updating the Domain Agent Definition
Log into weblogic console
Navigate to security realms –> myrealm –> Providers , select IAMSuiteAgentfirefox_2018-02-12_22-51-41
Go to provider specific tab, click on lock and edit. Update agent passwordfirefox_2018-02-12_22-55-13
click on save and Activate Changes, restart weblogic servers

Verifying TAP Partner Registration
Login to oamconsole, go to Authentication Schemes
Open TAPScheme, edit as below and click apply
firefox_2018-02-13_09-26-09
Launch Oracle Access Management tester

cd IAM_ORACLE_HOME/oam/server/tester/
java –jar oamtest.jar

validate as shown below
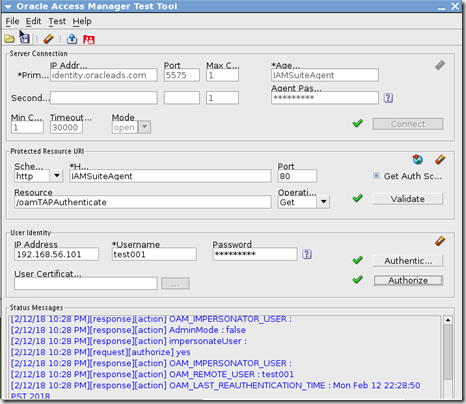
VirtualBox_2018-02-13_09-29-14

Set up TAP integration properties in OAAM
Make sure oaam managed server is running

mkdir -p temp/oaam_cli
cp –r OAAM_HOME/oaam/cli/. temp/oaam_cli

Edit temp/oaam_cli/conf/bharosa_properties/oaam_cli.properties below fields, rest fields keep as it is

oaam.adminserver.hostname=identity.oracleads.com
oaam.adminserver.port=7001
oaam.db.url=jdbc:oracle:thin:@identity.oracleads.com:1521:orcl
#keystore location entered in registerThirdPartyDAPPartner command
oaam.uio.oam.tap.keystoreFile=/app/Middleware/Oracle_IDM1/TAP/TapKeyStore/mykeystore.jks
#partnername entered in registerThirdPartyDAPPartner command
oaam.uio.oam.tap.partnername=OAAMTAPPartner
oaam.uio.oam.host=identity.oracleads.com
oaam.uio.oam.port=5575
oaam.uio.oam.webgate_id=IAMSuiteAgent
#communication security between OAAM and OAM
oaam.uio.oam.security.mode=1
oaam.csf.useMBeans=true

Save changes to oaam_cli.properties
Set Middleware home and Java home variables

export ORACLE_MW_HOME=/app/Middleware
export JAVA_HOME=/app/Middleware/jdk160_29

cd temp/oaam_cli/
chmod 777 setupOAMTapIntegration.sh

Run the OAAM setup integration script using the following command

./setupOAMTapIntegration.sh conf/bharosa_properties/oaam_cli.properties

Note: Enter the details on prompt. I have assigned all OAAM groups to default “”weblogic” user from weblogic console security realm. And used it as OAAM admin user

image
image
image
image
image
image

Configure Application Domain to use TAPScheme
Go to oam admin console, click on Application domains –> Application Domain –> Select Application Domain
Go to Authentication Policies and select Protected policy
firefox_2018-02-13_10-42-51Change the authentication scheme to TAPScheme and click on apply.
firefox_2018-02-13_10-43-40

now go to Application Domain –> IAM Suite –> Authentication Policies –> Select “Protected HigherLevel Policy”. Make sure /oamTAPAuthenticate is protected by LDAPSchemefirefox_2018-02-13_11-08-20

Testing
Make sure OHS, OAM and OAAM Managed servers are up and running.
Hit the TAPScheme protected resource
http://identity.oracleads.com:7777
Enter username click on continue
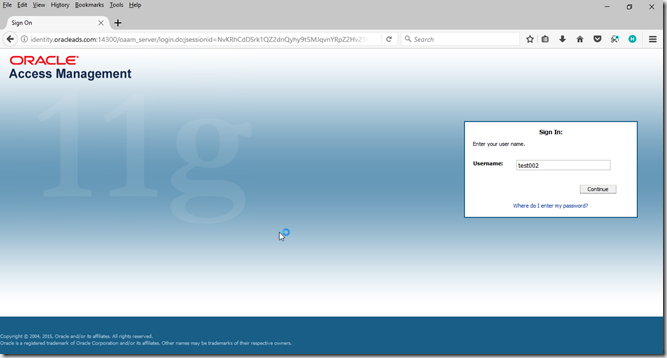
firefox_2018-02-13_11-11-54
Enter password click on enter
firefox_2018-02-13_11-12-30
Click continue for registrationfirefox_2018-02-14_08-23-01
Click continuefirefox_2018-02-14_08-23-38Enter security question and answers, click enterfirefox_2018-02-14_08-24-16firefox_2018-02-14_08-24-46

Demo: https://youtu.be/TIXXGWwM6oQ


OAM Integration with Google (Social Identity Provider) using OAuth

Go to oamconsole –> Configuration –> Available Services
firefox_2018-02-11_12-19-28

Enable Mobile and Social Service
firefox_2018-02-11_12-21-09

Go to Federation –> Social Identity
firefox_2018-02-11_12-22-32

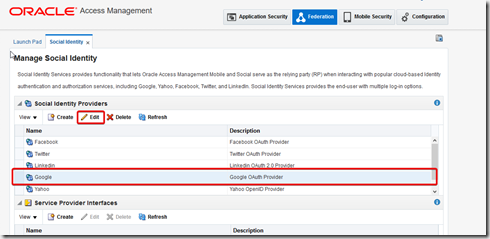
Select Google Identity provider and click on edit
firefox_2018-02-11_12-23-46

Here we need to enter consumer key and consumer secret
2018-02-11_12-26-05

For generating consumer key and consumer secret. Got to https://code.google.com/apis/console
Login to your gmail account
Click on the below icon on page
firefox_2018-02-11_12-29-06

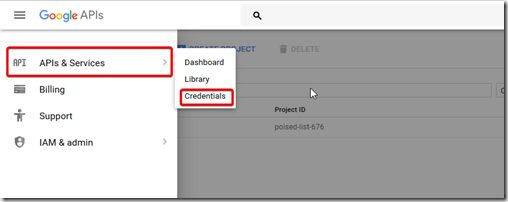
Go to API services –> Credentials
firefox_2018-02-11_12-30-12

Click on OAuth Client ID
firefox_2018-02-11_12-31-30firefox_2018-02-11_12-35-02
Copy Client ID and Client Secret
firefox_2018-02-11_12-35-52
Add authorized redirect URI as
http://<oam-server>:<oam-port>/oic_rp/return
http://<oam-server>:<oam-port>/oic_rp/popup

image
firefox_2018-02-12_10-29-52

When configuring Google’s Consent Screen in Google’s Developers Console, make sure the PRODUCT NAME matches the Application Profile name in M&S:firefox_2018-02-12_10-31-08

Go back to oamconsole –> Federation –> Social Identity –> Google
Paste the Client ID in the Consumer Key field and the Client Secret in the Consumer Secret field.
Click Apply to save your changes.
2018-02-11_12-40-09

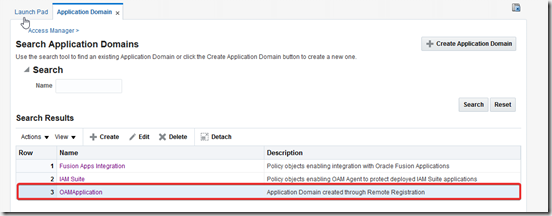
Now create/edit an Application Profile with the same name as your Application Policy Domain (OAMApplication, in my case).
select OAMApplication under Application Profiles and click on edit
Enter shared secret key of your choice, enable user registration. Click on apply
firefox_2018-02-11_13-17-10
image

Go to authentication schemes
firefox_2018-02-11_14-32-49
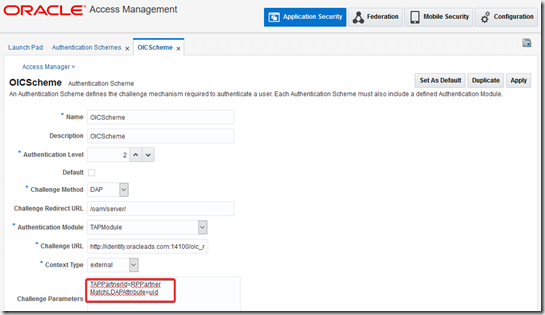
Edit OICScheme as belowfirefox_2018-02-11_14-33-57
Go to Application domain
firefox_2018-02-11_14-35-06
Select the application domain
firefox_2018-02-11_14-35-57
Go to Authentication Policy, Select itfirefox_2018-02-11_14-36-43
Select OICScheme authentication scheme
firefox_2018-02-11_14-37-55

Test:
http://identity.oracleads.com:7777
image

image

chrome_2018-02-11_15-35-26

To resolve this issue, 

Import into trust store of weblogic
keytool -import -v -trustcacerts -alias endeca-ca -file <certificate .der> -keystore <trustedstore.jks>
image
image

Note: Demo trust store password is DemoTrustKeyStorePassPhrase and for cacerts is changeit

  • Set the HostNameIdentifier in weblogic(10.3.6)  admin console to ‘None’ & Check JSSE SSL
    Enable
    Login to weblogic console
    Go to Home >Summary of Servers >oam_server1>SSL
    Click Lock and Edit
    image
    image
    Do same for omsm_server1
    Click Save, Activate Changes, Restart weblogic Servers
  • Make sure OMSM server is able to communicate with google servers

Test Again
Hit the protected URL
http://identity.oracleads.com:7777
chrome_2018-02-12_10-51-08
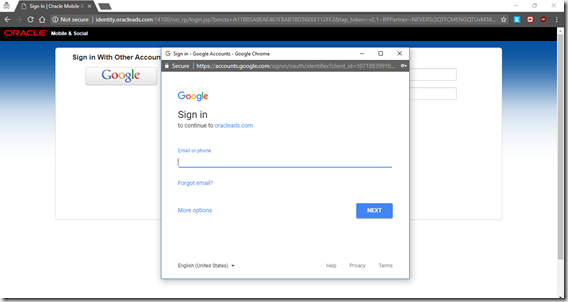
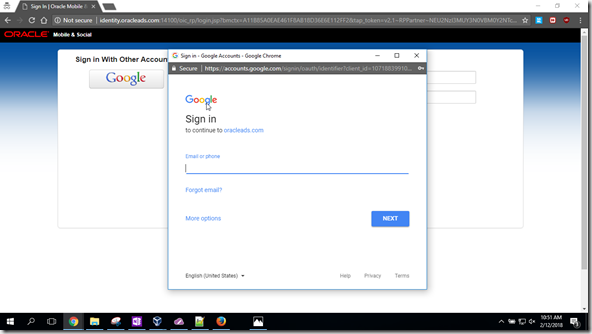
Click on Google
2018-02-12_10-51-58
Enter google username and password
chrome_2018-02-12_10-53-02
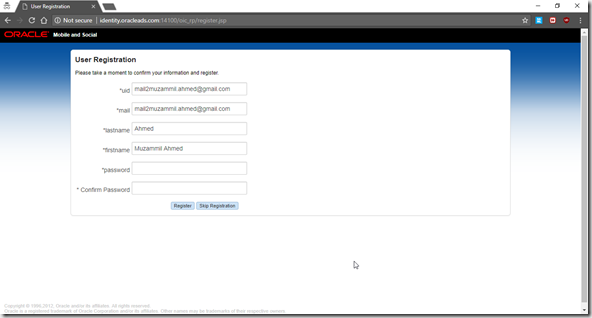
Fill in password click on register
chrome_2018-02-12_10-53-54
Protected resource is displayed. And user is registered in identity storefirefox_2018-02-12_10-55-14

Demo: https://www.youtube.com/watch?v=Gl7pMGkNNVw

OID start fail – Attach to shared memory failed

Error:
[2018-02-07T14:04:41.24987+03:00] [OID] [NOTIFICATION:16] [] [OIDMON] [host: abc.mylab.com] [pid: 12660] [tid: 0] Guardian: Connecting to database, connect string is oiddb

[2018-02-07T14:04:41.244473+03:00] [OID] [NOTIFICATION:16] [] [OIDMON] [host: abc.mylab.com] [pid: 12660] [tid: 0] Guardian: sgslusmInit: shmget failed with os error = 22

[2018-02-07T14:04:41.244550+03:00] [OID] [NOTIFICATION:16] [] [OIDMON] [host: abc.mylab.com] [pid: 12660] [tid: 0] Guardian: gslirsmSHMAttach: Attach to shared memory failed

[2018-02-07T14:04:41.244586+03:00] [OID] [NOTIFICATION:16] [] [OIDMON] [host: abc.mylab.com] [pid: 12660] [tid: 0] Guardian: gslsggMonRunningForStrt : Shared memory (key=12642) attach failed

Reason:
It is caused if UNIX Kernel Parameters are not set as per the requirements.
kernel.shmmax should be  10737418240 or higher OR 4294967295

Solution
1. Edit /etc/sysctl.conf , update kernel.shmmax to be 10737418240 or higher OR 4294967295
2. Enter the following command to change the current values of the kernel parameters:

# /sbin/sysctl –p

Review the output from this command to verify that the values are correct. If the values are incorrect, edit the /etc/sysctl.conf file, then enter this command again.

3. Enter the command /sbin/sysctl -a to confirm that the values are set correctly.