Oracle Access Management WebGate on OHS 12c

Pre- Requisite:
– OAM 12c installed and configured : https://oraidam.wordpress.com/2018/03/10/oracle-access-manager-12c-12-2-1-3-in-collocated-mode/
– OHS 12c installed and configured : https://oraidam.wordpress.com/2018/03/10/oracle-http-server-12c-12-2-1-3-in-collocated-mode/

Configure WebGate on OHS 12c

[oracle@oel1 deployWebGate]$ cd /u01/oracle/product/Oracle_Home/webgate/ohs/tools/deployWebGate

[oracle@oel1 deployWebGate]$ ./deployWebGateInstance.sh -w /u01/oracle/config/Domain_Home/ODS_Domain/config/fmwconfig/components/OHS/ohs1 -oh /u01/oracle/product/Oracle_Home

image

Verify webgate directory

[oracle@oel1 deployWebGate]$ cd /u01/oracle/config/Domain_Home/ODS_Domain/config/fmwconfig/components/OHS/ohs1
[oracle@oel1 ohs1]$ ll

image

Edit HTTP conf file

[oracle@oel1 InstallTools]$ export LD_LIBRARY_PATH=$LD_LIBRARY_PATH:/u01/oracle/product/Oracle_Home/lib

[oracle@oel1 InstallTools]$ cd /u01/oracle/product/Oracle_Home/webgate/ohs/tools/setup/InstallTools/

[oracle@oel1 InstallTools]$ ./EditHttpConf -w /u01/oracle/config/Domain_Home/ODS_Domain/config/fmwconfig/components/OHS/ohs1 -oh /u01/oracle/product/Oracle_Home

image

Register the WebGate with OAM

Login to OAM console
http://oel1.mylab.com:7011/oamconsole

Click on SSO Agent Registration

XWin_MobaX_2018-03-06_15-12-08
Specify Agent Type as Webgate and click Next.
Fill in the details for webgate as shown below
image
Click Finish.
Then click on download and save the file.
XWin_MobaX_2018-03-06_15-15-51

Copy the zip file to ohs_instance/webgate/config and unzip

[oracle@oel1 Downloads]$ cp OHS12c_WebGate.zip /u01/oracle/config/Domain_Home/ODS_Domain/config/fmwconfig/components/OHS/ohs1/webgate/config/
[oracle@oel1 Downloads]$ unzip OHS12c_WebGate.zip

Restart Servers

[oracle@oel1 Downloads]$ cd /u01/oracle/config/Domain_Home/ODS_Domain/bin/
[oracle@oel1 bin]$ ./stopComponent.sh ohs1
[oracle@oel1 bin]$ ./stopManagedWebLogic.sh oam_policy_mgr1
[oracle@oel1 bin]$ ./stopManagedWebLogic.sh oam_server1
[oracle@oel1 bin]$ ./stopWeblogic.sh

[oracle@oel1 bin]$ ./startWeblogic.sh
[oracle@oel1 bin]$ ./startManagedWebLogic.sh oam_server1
[oracle@oel1 bin]$ ./startManagedWebLogic.sh oam_policy_mgr1
[oracle@oel1 bin]$ ./startComponent.sh ohs1

Test
Access OHS : http://oel1.mylab.com:7777
User will be redirected to OAM login page

XWin_MobaX_2018-03-06_15-59-05XWin_MobaX_2018-03-06_15-59-31

Oracle Access Manager 12c 12.2.1.3 in collocated mode

To install OAM in collocated mode, we must first install Oracle Fusion Middleware Infrastructure 12c followed by Oracle Access Manager 12c. Infrastructure and and OAM must be installed in same Oracle Home.

Directory Structure

[oracle@oel1 /]$ cd /u02/
[oracle@oel1 u02]$ mkdir -p oracle/product/Oracle_Home
[oracle@oel1 u02]$ mkdir -p oracle/config/Domain_Home
[oracle@oel1 u02]$ mkdir -p oracle/config/Application_Home

[oracle@oel1 u02]$ tree oracle/
oracle/
├── config
│   ├── Application_Home
│   └── Domain_Home
└── product
     └── Oracle_Home

Install Infrastructure 12c

[oracle@oel1 OAM12c]$ unzip fmw_12.2.1.3.0_infrastructure_Disk1_1of1.zip
[oracle@oel1 OAM12c]$ java -jar fmw_12.2.1.3.0_infrastructure.jar

Navigate through installation screens clicking Next, select or browse to correct Oracle Home on Installation Location screen.
image
image_thumb6

Install Oracle Access Manager 12c

[oracle@oel1 OAM12c]$ unzip fmw_12.2.1.3.0_idm_Disk1_1of1.zip
[oracle@oel1 OAM12c]$ java -jar fmw_12.2.1.3.0_idm.jar

Navigate through installation screens clicking Next, select or browse to correct Oracle Home on Installation Location screen.
image
image
image
image

Create Schemas

[oracle@oel1 Oracle_Home]$ cd /u02/oracle/product/Oracle_Home/oracle_common/bin/
[oracle@oel1 bin]$ ./rcu

image
image
select the Oracle Access Manager schema.
This action automatically selects the following schemas as dependencies:
• Common Infrastructure Services (STB)
• Oracle Platform Security Services (OPSS)
• Audit Services (IAU)
• Audit Services Append (IAU_Append)
• Audit Services Viewer (IAU_Viewer)
• Metadata Services (MDS)
• WebLogic Services (WLS)
image
image
image
image

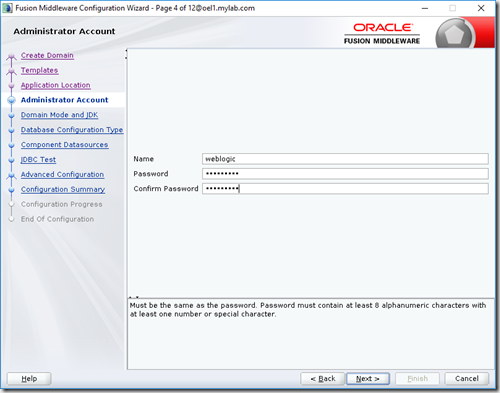
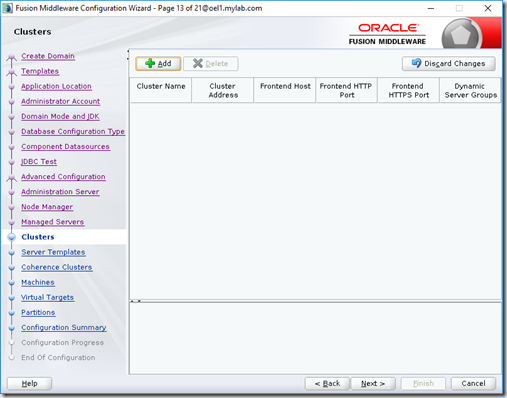
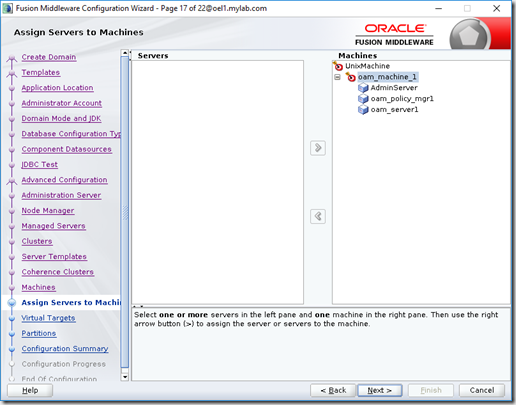
Configure OAM Domain

[oracle@oel1 bin]$ cd /u02/oracle/product/Oracle_Home/oracle_common/common/bin
[oracle@oel1 bin]$ ./config.sh

image
select the template Oracle Access Management Suite. Selecting this template automatically selects the following as dependencies:
• Oracle Enterprise Manager
• Oracle JRF
• WebLogic Coherence Cluster Extension
image
image
image
image
image
image
image
image
image
image
image
image
image
image
image
image
image
image
image
image

Start Servers

[oracle@oel1 bin]$ cd /u02/oracle/config/Domain_Home/OAM_Domain/bin
[oracle@oel1 bin]$ nohup ./startWebLogic.sh &

image

[oracle@oel1 bin]$ cd /u02/oracle/config/Domain_Home/OAM_Domain/bin
[oracle@oel1 bin]$ nohup ./startNodeManager.sh &

image

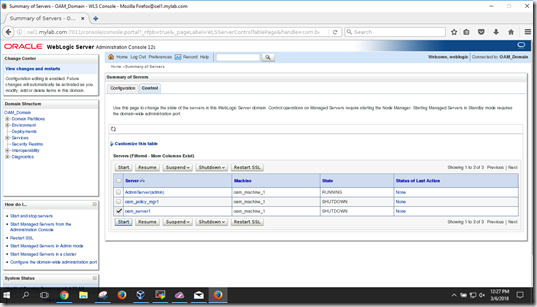
Login to weblogic console
http://oel1.mylab.com:7011/console
Go to Servers –> Control
Select the server and click Start
image
image

OAM Console: http://oel1.mylab.com:7011/oamconsole
image
image

Integrate OAM 11g R2 PS3 and Oracle Mobile Authenticator

Below steps cover integration of OAM with OMA for strong authentication i.e multi factor authentication.

Pre-requisites:
1. Oracle Access Manager 11gR2PS3 installed and configured
2. Oracle HTTP Sever installed and configured
3. OAM WebGate OHS installed and configured

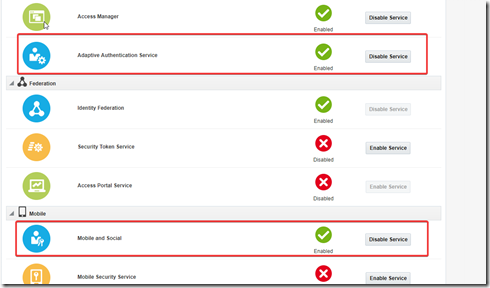
  1. Enable “Mobile and Social Service” & “Adaptive Authentication Service”, login to OAM console –> Configuration –> Available Services
    chrome_2018-01-28_16-00-15
  2. Configure OAuth
    image
    image
    image
    chrome_2018-01-28_15-42-06
    image
    image
    Click on apply
  3. Edit “TOTPPlugin” Authentication Plugin
    image
  4. Edit “TOTPModule” Authentication Module
    image
    image
  5. Create New Authentication Scheme
    Go to LDAPScheme and duplicate
    chrome_2018-01-28_15-54-43chrome_2018-01-30_09-19-36
  6. Update authentication policy in application domain
    imagechrome_2018-01-28_16-03-33
    image
    chrome_2018-01-28_16-06-01
  7. Create a HTML page with below content and copy it in any web server
    image
    To generate QR Code follow https://docs.oracle.com/cd/E52734_01/oam/AIAAG/GUID-800C0912-8452-4DA7-9762-A2A21E897C17.htm#AIAAG90224
  8. Download and install Oracle mobile authenticator app from play store or google play
  9. Open above HTML page in mobile browser. Click on the link on page. Enter username and password on prompt.

Test the application access. User will be prompted for LDAP authentication and post authentication user will be prompted for entering OTP.
chrome_2018-01-30_09-22-07
chrome_2018-01-30_09-22-45

chrome_2018-01-30_09-26-52
chrome_2018-01-30_09-26-55

Oracle Database 11gR2 11.2.0.4 Installation–Oracle Linux 7


1. Unzip Files


2. Edit /etc/hosts file as below

<IP-address>  <fully-qualified-machine-name>  <machine-name>

192.168.1.4 ol7.dev ol7


3. Prerequisites setup: Execute below command

# yum install oracle-rdbms-server-11gR2-preinstall


4. Edit /etc/selinux/config as below

SELINUX=permissive


5. Restart the server


6. Execute below command

# setenforce Permissive


7. Create directories by executing below commands

mkdir -p /u01/app/oracle/product/11.2.0.4/db_1

chown -R oracle:oinstall /u01

chmod -R 775 /u01


8. Append /home/oracle/.bash_profile with below

# Oracle Database Settings

TMP=/tmp; export TMP

TMPDIR=$TMP; export TMPDIR

ORACLE_HOSTNAME=ol7.dev; export ORACLE_HOSTNAME

ORACLE_UNQNAME=DB11G; export ORACLE_UNQNAME

ORACLE_BASE=/u01/app/oracle; export ORACLE_BASE

ORACLE_HOME=$ORACLE_BASE/product/11.2.0.4/db_1; export ORACLE_HOME

ORACLE_SID=DB11G; export ORACLE_SID

ORACLE_TERM=xterm; export ORACLE_TERM

PATH=/usr/sbin:$PATH; export PATH

PATH=$ORACLE_HOME/bin:$PATH; export PATH

LD_LIBRARY_PATH=$ORACLE_HOME/lib:/lib:/usr/lib; export LD_LIBRARY_PATH

CLASSPATH=$ORACLE_HOME/JRE:$ORACLE_HOME/jlib:$ORACLE_HOME/rdbms/jlib; export CLASSPATH

if [ $USER = “oracle” ]; then

  if [ $SHELL = “/bin/ksh” ]; then

    ulimit -p 16384

    ulimit -n 65536

  else

    ulimit -u 16384 -n 65536

  fi

fi


9. Start installer

./runInstaller


10. Installer screen shots


wps_clip_image-31370[4] 


wps_clip_image-9950[4] 


wps_clip_image-26096[4] 


wps_clip_image-16741[4] 


wps_clip_image-32761[4] 


wps_clip_image-16534[4] 


wps_clip_image-31777[4] 


wps_clip_image-14858[4] 


wps_clip_image-13477[4] 


wps_clip_image-22016[4] 


wps_clip_image-29652[4] 


wps_clip_image-13405[4] 


wps_clip_image-1446[4] 


wps_clip_image-30283[4] 


11. You will encounter an error invoking the “ins_emagent.mk” file.

To fix this, edit the “$ORACLE_HOME/sysman/lib/ins_emagent.mk”

FROM:

(MK_EMAGENT_NMECTL)

TO  :

(MK_EMAGENT_NMECTL) -lnnz11


Click on retry


12. Post installation edit /etc/oratab as below

DB11G:/u01/app/oracle/product/11.2.0.4/db_1:Y